一、简介
Atlas是由 Qihoo 360, Web平台部基础架构团队开发维护的一个基于MySQL协议的数据中间层项目。它是在mysql-proxy 0.8.2版本的基础上,对其进行了优化,增加了一些新的功能特性。
Atlas是一个位于应用程序与MySQL之间中间件。在后端DB看来,Atlas相当于连接它的客户端,在前端应用看来,Atlas相当于一个DB。Atlas作为服务端与应用程序通讯,它实现了MySQL的客户端和服务端协议,同时作为客户端与MySQL通讯。它对应用程序屏蔽了DB的细节,同时为了降低MySQL负担,它还维护了连接池。
下载地址:https://github.com/Qihoo360/Atlas/releases
二、整体架构
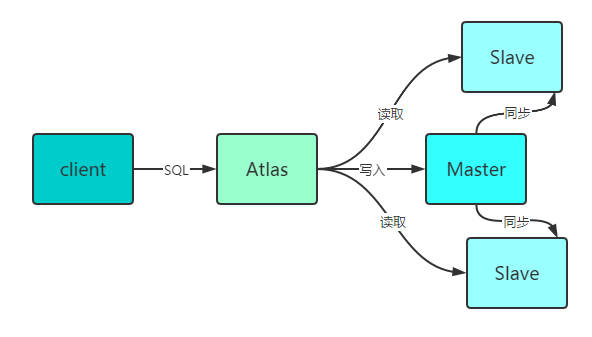
以一主多从为例。Atlas将读请求分发到两个从库节点,写请求分发到主库节点,实现读写分离。

三、安装
环境:主库节点:10.0.0.52(db02)。从库节点:10.0.0.51(db01)、10.0.0.53(db03)。
一般来说Atlas安装在一台独立节点为好,这里我就安装在主库节点了。
[root@db02 ~]# wget https://github.com/Qihoo360/Atlas/releases/download/2.2.1/Atlas-2.2.1.el6.x86_64.rpm
[root@db02 ~]# yum install -y Atlas-2.2.1.el6.x86_64.rpm
[root@db02 ~]# cd /usr/local/mysql-proxy/conf/
[root@db02 conf]# cp test.cnf test.cnf.bak
[root@db02 conf]# vim test.cnf
[mysql-proxy]
admin-username = user
admin-password = pwd
proxy-backend-addresses = 10.0.0.52:3306
proxy-read-only-backend-addresses = 10.0.0.51:3306,10.0.0.53:3306
pwds = repl:NI7kKk56jaI=,mha:O2jBXONX098=
daemon = true
keepalive = true
event-threads = 8
log-level = message
log-path = /usr/local/mysql-proxy/log
sql-log=ON
proxy-address = 0.0.0.0:1234
admin-address = 0.0.0.0:2345
charset=utf8

[root@db02 conf]# /usr/local/mysql-proxy/bin/mysql-proxyd test start

以上配置含义请查看模板文件test.cnf.bak,里面有详细的中文注释。
或者查看官方文档:https://github.com/Qihoo360/Atlas/wiki/Atlas%E7%9A%84%E5%AE%89%E8%A3%85
启动时的test,是conf目录下配置文件的名字,也是配置文件里instance项的名字(如果定义了),三者需要统一。
四、读写分离测试
测试读。对于读的测试,我们可以通过查询数据库的server_id实现,因为在主从环境,各个节点的数据库server_id是不同的。通过以下查询,我们可以清楚观测到两次查询操作被分配到db01和db03上了。
[root@db02 ~]# mysql -h10.0.0.52 -umha -pmha -P1234
mysql> select @@server_id;
+-------------+
| @@server_id |
+-------------+
|           3 |
+-------------+

mysql> select @@server_id;
+-------------+
| @@server_id |
+-------------+
|           1 |
+-------------+
测试写。对于写的操作,我们可以专门开启一个事务来查询server_id。Atlas会认为事务是写操作,所以会将请求分配到主库db02节点。
mysql> begin; select @@server_id; commit;
+-------------+
| @@server_id |
+-------------+
|           2 |
+-------------+
五、Atlas管理
查看管理Atlas的各类命令
[root@db02 ~]# mysql -h10.0.0.52 -uuser -ppwd -P2345
mysql> select * from help;
+----------------------------+---------------------------------------------------------+
| command                    | description                                             |
+----------------------------+---------------------------------------------------------+
| SELECT * FROM help         | shows this help                                         |
| SELECT * FROM backends     | lists the backends and their state                      |
| SET OFFLINE $backend_id    | offline backend server, $backend_id is backend_ndx's id |
| SET ONLINE $backend_id     | online backend server, ...                              |
| ADD MASTER $backend        | example: "add master 127.0.0.1:3306", ...               |
| ADD SLAVE $backend         | example: "add slave 127.0.0.1:3306", ...                |
| REMOVE BACKEND $backend_id | example: "remove backend 1", ...                        |
| SELECT * FROM clients      | lists the clients                                       |
| ADD CLIENT $client         | example: "add client 192.168.1.2", ...                  |
| REMOVE CLIENT $client      | example: "remove client 192.168.1.2", ...               |
| SELECT * FROM pwds         | lists the pwds                                          |
| ADD PWD $pwd               | example: "add pwd user:raw_password", ...               |
| ADD ENPWD $pwd             | example: "add enpwd user:encrypted_password", ...       |
| REMOVE PWD $pwd            | example: "remove pwd user", ...                         |
| SAVE CONFIG                | save the backends to config file                        |
| SELECT VERSION             | display the version of Atlas                            |
+----------------------------+---------------------------------------------------------+
查看所有节点
mysql> select * from backends;
+-------------+----------------+-------+------+
| backend_ndx | address        | state | type |
+-------------+----------------+-------+------+
|           1 | 10.0.0.52:3306 | up    | rw   |
|           2 | 10.0.0.51:3306 | up    | ro   |
|           3 | 10.0.0.53:3306 | up    | ro   |
+-------------+----------------+-------+------+
节点的上线和下线
mysql> set offline 1;
+-------------+----------------+---------+------+
| backend_ndx | address        | state   | type |
+-------------+----------------+---------+------+
|           1 | 10.0.0.52:3306 | offline | rw   |
+-------------+----------------+---------+------+

mysql> select * from backends;
+-------------+----------------+---------+------+
| backend_ndx | address        | state   | type |
+-------------+----------------+---------+------+
|           1 | 10.0.0.52:3306 | offline | rw   |
|           2 | 10.0.0.51:3306 | up      | ro   |
|           3 | 10.0.0.53:3306 | up      | ro   |
+-------------+----------------+---------+------+

mysql> set online 1;
+-------------+----------------+---------+------+
| backend_ndx | address        | state   | type |
+-------------+----------------+---------+------+
|           1 | 10.0.0.52:3306 | unknown | rw   |
+-------------+----------------+---------+------+

mysql> select * from backends;
+-------------+----------------+-------+------+
| backend_ndx | address        | state | type |
+-------------+----------------+-------+------+
|           1 | 10.0.0.52:3306 | up    | rw   |
|           2 | 10.0.0.51:3306 | up    | ro   |
|           3 | 10.0.0.53:3306 | up    | ro   |
+-------------+----------------+-------+------+
删除和添加节点
mysql> remove backend 3;
mysql> select * from backends;
+-------------+----------------+-------+------+
| backend_ndx | address        | state | type |
+-------------+----------------+-------+------+
|           1 | 10.0.0.52:3306 | up    | rw   |
|           2 | 10.0.0.51:3306 | up    | ro   |
+-------------+----------------+-------+------+

mysql> add slave 10.0.0.53:3306;
mysql> select * from backends;
+-------------+----------------+-------+------+
| backend_ndx | address        | state | type |
+-------------+----------------+-------+------+
|           1 | 10.0.0.52:3306 | up    | rw   |
|           2 | 10.0.0.51:3306 | up    | ro   |
|           3 | 10.0.0.53:3306 | up    | ro   |
+-------------+----------------+-------+------+
用户管理。要将用户添加到Atlas中,后端节点必须有这个用户。即先到主库创建用户,再连接到Atlas管理界面进行添加。
1、主库添加用户
[root@db02 ~]# mysql -uroot -p000000
mysql> grant all on *.* to test@'%' identified by '000000';

2、Atlas添加用户
[root@db02 ~]# mysql -h10.0.0.52 -uuser -ppwd -P2345
mysql> add pwd test:000000;
mysql> select * from pwds;
+----------+--------------+
| username | password     |
+----------+--------------+
| repl     | NI7kKk56jaI= |
| mha      | O2jBXONX098= |
| test     | NI7kKk56jaI= |
+----------+--------------+

3、Atlas删除用户
mysql> remove pwd test;
mysql> select * from pwds;
+----------+--------------+
| username | password     |
+----------+--------------+
| repl     | NI7kKk56jaI= |
| mha      | O2jBXONX098= |
+----------+--------------+
注意以上所有的管理操作,要想永久生效,必须执行 "save config;" 来保存到配置文件中。