5
一、架构
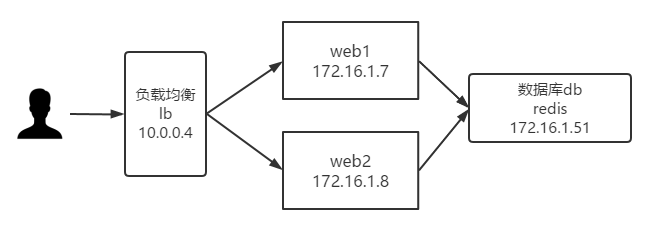
二、数据库搭建
[root@db ~]# yum install -y mariadb-server
[root@db ~]# systemctl start mariadb
[root@db ~]# systemctl enable mariadb
[root@db ~]# mysqladmin -uroot password 000000
[root@db ~]# mysql -uroot -p000000
Welcome to the MariaDB monitor.  Commands end with ; or \g.
Your MariaDB connection id is 3
Server version: 5.5.65-MariaDB MariaDB Server

Copyright (c) 2000, 2018, Oracle, MariaDB Corporation Ab and others.

Type 'help;' or '\h' for help. Type '\c' to clear the current input statement.

MariaDB [(none)]> create database wordpress;
Query OK, 1 row affected (0.00 sec)

MariaDB [(none)]> grant all on wordpress.* to 'cp'@'%' identified by '000000';
Query OK, 0 rows affected (0.00 sec)

[root@db ~]# setenforce 0
[root@db ~]# systemctl stop firewalld && systemctl disable firewalld
三、web集群构建(演示一个节点,其余web节点相同操作)
(1)安装nginx
[root@web1 ~]# vim /etc/yum.repos.d/nginx.repo
[nginx-stable]
name=nginx stable repo
baseurl=http://nginx.org/packages/centos/$releasever/$basearch/
gpgcheck=1
enabled=1
gpgkey=https://nginx.org/keys/nginx_signing.key
module_hotfixes=true
[root@web1 ~]# yum install -y nginx
(2) 安装php
[root@web1 ~]# yum install -y http://rpms.remirepo.net/enterprise/remi-release-7.rpm
[root@web1 ~]# yum install -y php74-php-fpm php74-php-mysqlnd php74-php-mbstring php74-php-pecl php74-php-pecl-redis5
            //注意这是精简安装,至于需要什么php扩展自行安装
(3)统一运行用户
[root@web1 ~]# groupadd -g 666 www
[root@web1 ~]# useradd -u666 -g666 www
[root@web1 ~]# sed -i '/^user/c user www;' /etc/nginx/nginx.conf
[root@web1 ~]# sed -i '/^user/c user = www' /etc/opt/remi/php74/php-fpm.d/www.conf
[root@web1 ~]# sed -i '/^group/c group = www' /etc/opt/remi/php74/php-fpm.d/www.conf
(4)准备项目代码和nginx配置文件
[root@web1 ~]# wget https://files.phpmyadmin.net/phpMyAdmin/5.0.2/phpMyAdmin-5.0.2-all-languages.zip
[root@web1 ~]# unzip phpMyAdmin-5.0.2-all-languages.zip -d /
[root@web1 ~]# ln -s /phpMyAdmin-5.0.2-all-languages /phpmyadmin
[root@web1 ~]# gzip /etc/nginx/conf.d/default.conf
[root@web1 ~]# vim /etc/nginx/conf.d/phpmyadmin.conf
server {
        listen 80;
        server_name phpmyadmin.cp.com;
        root /phpmyadmin;

        location / {
                index index.php;
        }

        location ~ \.php$ {
                fastcgi_pass 127.0.0.1:9000;
                fastcgi_param SCRIPT_FILENAME $document_root$fastcgi_script_name;
                include fastcgi_params;
        }
}
(5)配置数据库连接
[root@web1 ~]# cp /phpmyadmin/config.sample.inc.php /phpmyadmin/config.inc.php
[root@web1 ~]# vim /phpmyadmin/config.inc.php       //修改下列配置
$cfg['Servers'][$i]['host'] = '172.16.1.51';

[root@web1 ~]# chown -R www.www /phpmyadmin/
[root@web1 ~]# chown -R www.www /var/opt/remi/php74/lib/php/session
(6)启动
[root@web1 ~]# systemctl restart nginx php74-php-fpm
[root@web1 ~]# systemctl enable nginx php74-php-fpm
[root@web1 ~]# systemctl stop firewalld
[root@web1 ~]# systemctl disable firewalld
[root@web1 ~]# setenforce 0
四、负载均衡搭建
(1)安装nginx
[root@lb ~]# vim /etc/yum.repos.d/nginx.repo
[nginx-stable]
name=nginx stable repo
baseurl=http://nginx.org/packages/centos/$releasever/$basearch/
gpgcheck=1
enabled=1
gpgkey=https://nginx.org/keys/nginx_signing.key
module_hotfixes=true
[root@lb ~]# yum install -y nginx
(2)配置七层负载均衡
[root@lb ~]# groupadd -g 666 www && useradd -u666 -g666 www
[root@lb ~]# sed -i '/^user/c user www;' /etc/nginx/nginx.conf
[root@lb ~]# gzip /etc/nginx/conf.d/default.conf
[root@lb ~]# vim /etc/nginx/conf.d/proxy_phpmyadmin.conf

upstream phpmyadmin {
    server 172.16.1.7:80;
    server 172.16.1.8:80;
}

server {
    listen 80;
    server_name phpmyadmin.cp.com;

    location / {
        proxy_pass http://phpmyadmin;
        include proxy_params;
    }
}
[root@lb ~]# vim /etc/nginx/proxy_params
proxy_http_version 1.1;

proxy_set_header Host $http_host;
proxy_set_header X-Real-IP $remote_addr;
proxy_set_header X-Forwarded-For $proxy_add_x_forwarded_for;

proxy_connect_timeout 30;
proxy_send_timeout 60;
proxy_read_timeout 60;

proxy_buffering on;
proxy_buffer_size 32k;
proxy_buffers 4 128k;

[root@lb ~]# systemctl restart nginx
[root@lb ~]# setenforce 0
[root@lb ~]# systemctl stop firewalld && systemctl disable firewalld
(3)测试
修改本地电脑的hosts的文件,配置本地host解析,位于C:\Windows\System32\drivers\etc,添加10.0.0.4 phpmyadmin.cp.com。
通过浏览器访问测试,可以发现一直登录不上,这是为什么呢?
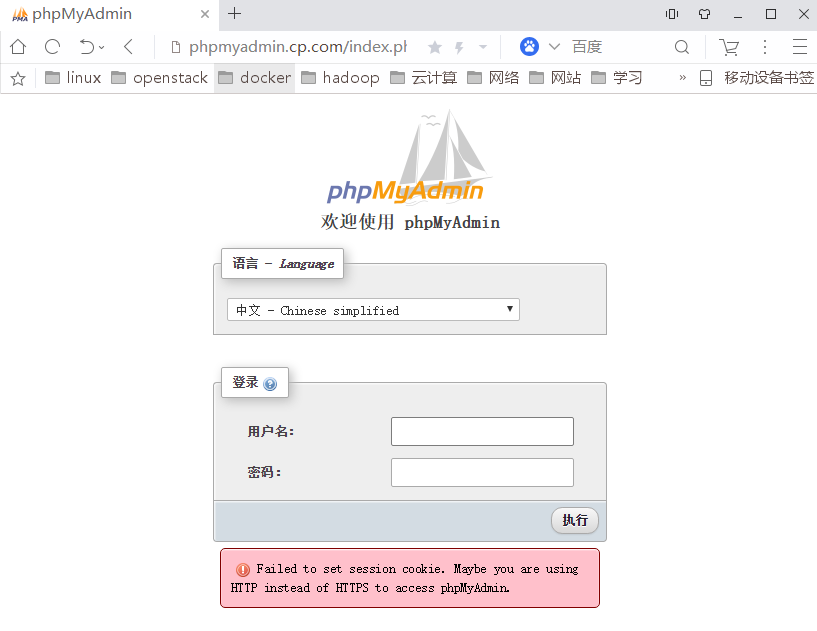
因为当用户通过负载均衡去访问web节点时是通过调度算法来分配请求的。举个例子,当用户登录时,点击登录的那一刻便是一个新请求了,而此时这个请求便会通过负载均衡会分配到另一个节点,而另一个节点会认为这是一个新用户又重新分配一个session ID给它,这样登录信息就丢失了,会出现怎么也登不上的情况发生。为此我们通过部署Redis来共享session ID来实现会话共享解决这个问题。
五、Redis服务搭建
(1)安装配置
[root@db ~]# yum install -y redis
[root@db ~]# sed -i '/^bind/c bind 127.0.0.1 172.16.1.51' /etc/redis.conf
[root@db ~]# systemctl restart redis
[root@db ~]# systemctl enable redis
(2)修改php配置文件
修改web1和web2节点的php程序配置文件,将原本存储至本地的SessionID,修改为存储至远程的Redis服务器
[root@web1 ~]# vim /etc/opt/remi/php74/php.ini              //修改以下配置
session.save_handler = redis
session.save_path = "tcp://172.16.1.51:6379"

[root@web1 ~]# vim /etc/opt/remi/php74/php-fpm.d/www.conf  //注释以下配置,位于最后几行
;php_value[session.save_handler] = files
;php_value[session.save_path]    = /var/opt/remi/php74/lib/php/session

[root@web1 ~]# systemctl restart php74-php-fpm
六、测试
此时可以正常登录,我们可以观测到每刷新一次都会转移到另一个节点(有时候效果可能不会太明显多刷新几次),同时一直处于登录状态。 我们可以分别去观测对比,以上处于不同节点时的Session ID,可以发现是不变的。
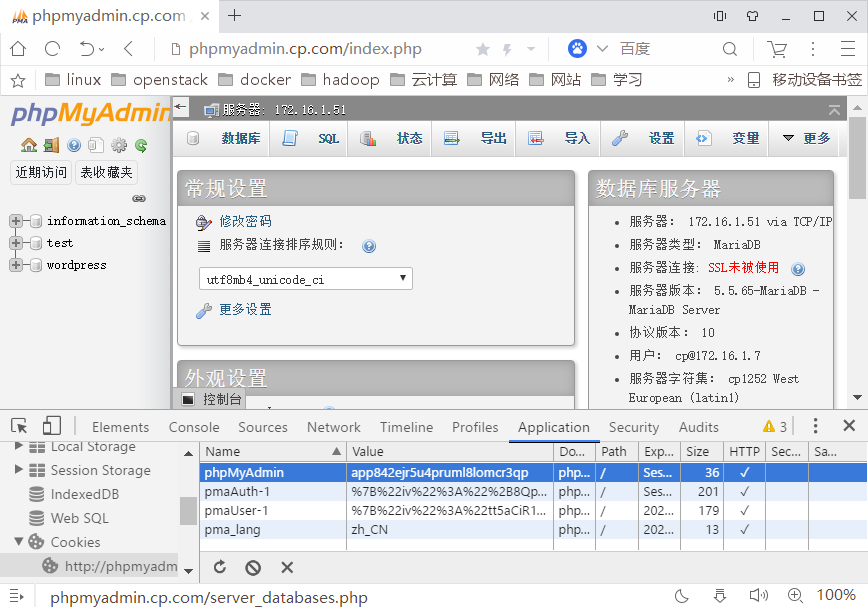
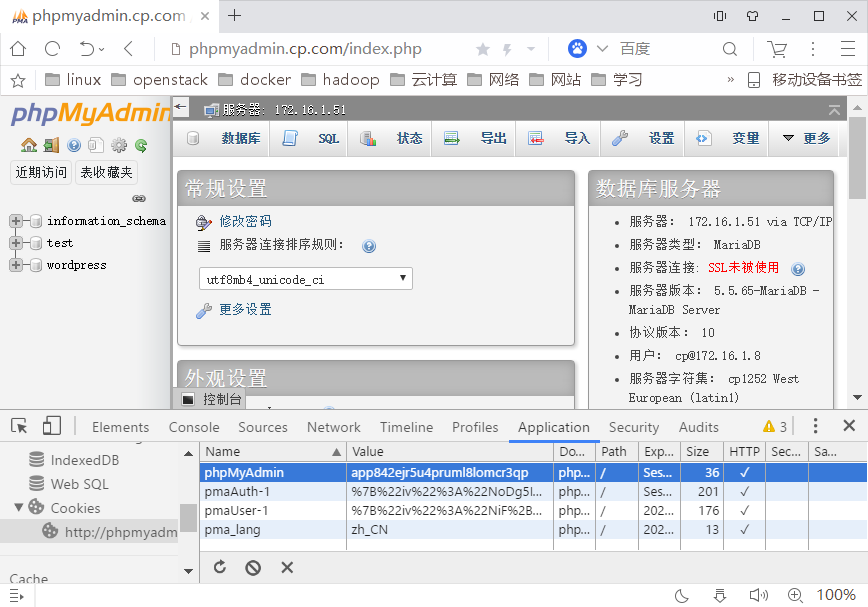
测试结果:登录正常,无论如何刷新,都是保持登录状态,而且session_id不变,我们可以看下redis服务端保存的session_id值。
[root@db ~]# redis-cli
127.0.0.1:6379> keys *
1) "PHPREDIS_SESSION:app842ejr5u4pruml8lomcr3qp"
127.0.0.1:6379>
5