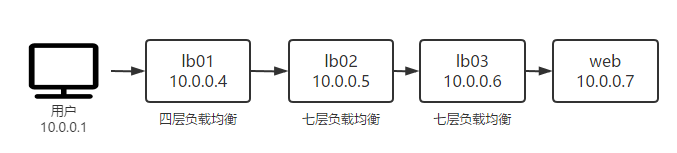
一、案例环境
二、多七层负载均衡透传真实IP
首先我们去掉四层负载均衡,进行多七层负载均衡透传真实IP的案例。
[root@lb02 ~]# vi /etc/nginx/conf.d/test.conf
upstream test {
    server 172.16.1.6;
}

server {
    listen 80;
    server_name test.cp.com;

    location / {
        proxy_pass http://test;
        proxy_set_header Host $http_host;       # 这是必要设置,传递域名。
    }
}

[root@lb03 ~]# vi /etc/nginx/conf.d/test.conf
upstream test {
    server 172.16.1.7;
}

server {
    listen 80;
    server_name test.cp.com;

    location / {
        proxy_pass http://test;
        proxy_set_header Host $http_host;
    }
}
配置好上面两个七层负载均衡,此时我们去访问test.cp.com(记得做本地dns解析),然后查看web节点的nginx访问日志。
[root@web1 ~]# tailf /var/log/nginx/access.log

10.0.0.6 - - [02/Sep/2020:03:38:15 -0400] "GET / HTTP/1.0" 304 0 "-" "Mozilla/5.0 (Windows NT 10.0; WOW64) AppleWebKit/537.36 (KHTML, like Gecko) Chrome/55.0.2883.87 UBrowser/6.2.4098.3 Safari/537.36" "-"
这里我们只看第一个字段和最后一个字段的值。第一个字段为$remote_addr,用来记录与之直连的上一个客户端的IP地址,可以说是最后一层代理的IP地址,这里值为10.0.0.6;最后一个字段为$http_x_forwarded_for,用来记录客户端真实IP地址,此时值为空。
但这样的话我们的web后端便失去了客户端的真实IP,对此我们可以进行以下配置来添加额外的请求头信息传递到后端。
[root@lb02 ~]# vi /etc/nginx/conf.d/test.conf       // lb03添加相同配置
upstream test {
    server 10.0.0.6;
}

server {
    listen 80;
    server_name test.cp.com;

    location / {
        proxy_pass http://test;
        proxy_set_header Host $http_host;
        proxy_set_header X-Forwarded-For $proxy_add_x_forwarded_for;   # 即将后面变量赋值给前面字段,代理将此字段添加到http头部
    }
}

--------------------------------------------------------------------

X-Forwarded-For:是一个自定义HTTP扩展头部字段,注意既然是自定义那肯定是不安全的实际上非常容易伪造。
$proxy_add_x_forwarded_for:是 ngx_http_proxy_module 模块的内嵌变量。可以说它的值其实就是保存每个代理的$remote_addr得来的。
$http_x_forwarded_for:用来获取HTTP头信息中X-Forwarded-For字段的值。

真实的客户端IP会被负载均衡放在HTTP头部我们自定义X-Forwarded-For字段,格式如下:
X-Forwarded-For: 用户真实IP, 代理服务器1-IP, 代理服务器2-IP,...
查看web节点的nginx访问日志,我们可以看到最后一个字段记录了客户端真实IP和第一个代理IP。
[root@web1 ~]# tailf /var/log/nginx/access.log

10.0.0.6 - - [02/Sep/2020:04:15:06 -0400] "GET / HTTP/1.0" 304 0 "-" "Mozilla/5.0 (Windows NT 10.0; WOW64) AppleWebKit/537.36 (KHTML, like Gecko) Chrome/55.0.2883.87 UBrowser/6.2.4098.3 Safari/537.36" "10.0.0.1, 10.0.0.5"
伪造客户端真实IP
[root@lb02 ~]# curl http://test.cp.com -H 'X-Forwarded-For: 1.1.1.1'    // 注意配置本地域名解析
测试多层级代理透传真实IP

[root@web1 ~]# tailf /var/log/nginx/access.log
10.0.0.6 - - [02/Sep/2020:05:10:05 -0400] "GET / HTTP/1.0" 200 36 "-" "curl/7.29.0" "1.1.1.1, 10.0.0.5, 10.0.0.5"
三、四层负载均衡+七层负载均衡透传真实IP
要想从四层负载均衡透传真实IP到七层负载均衡,我们先要明白四层负载均衡工作在传输层,只有TCP/UDP协议,这两种协议中只包含源IP、目标IP、源端口号及目的端口号,并不会携带http头信息,这样的话我们就无法定义X-Forwarded-For字段传递客户端真实IP,这就意味着用户的真实IP就会丢失,最后导致我们后端web节点获取到只会是四层负载均衡的IP。
[root@web1 ~]# tailf /var/log/nginx/access.log

10.0.0.6 - - [02/Sep/2020:07:42:18 -0400] "GET / HTTP/1.0" 200 36 "-" "Mozilla/5.0 (Windows NT 10.0; Win64; x64) AppleWebKit/537.36 (KHTML, like Gecko) Chrome/80.0.3987.106 Safari/537.36" "10.0.0.4, 10.0.0.5"
要解决这个问题,这里我们要引入一个知识点—proxy protocol :它是一个Internet协议,通过为tcp添加一个很小的头信息,来方便的传递客户端信息(协议栈、源IP、目的IP、源端口、目的端口等),其本质是在三次握手结束后由代理在传输中插入了一个携带了原始连接元组信息的数据包。
[root@lb01 ~]# vim /etc/nginx/nginx.conf            // stream配置在http层,与其同级
stream {

    log_format proxy '$remote_addr -  [$time_local]  $status $protocol'
                     '"$upstream_addr" "$upstream_bytes_sent" "$upstream_connect_time"';

    access_log /var/log/nginx/lb4.log proxy;

    upstream lb {
        server 10.0.0.5:80;
    }

    server {
        listen 80;
        proxy_pass lb;
        proxy_protocol on;      # 开启proxy protocol 协议
    }
}

[root@lb02 ~]# vi /etc/nginx/conf.d/test.conf
upstream test {
    server 10.0.0.6;
}

server {
    listen 80 proxy_protocol;
    server_name test.cp.com;

# 定义已知可替换的可信任地址。当前四层传递过来的有客户端真实ip和四层本身ip,此处设置可以理解为排除四层本身ip,一般填写当前代理之前的代理的ip地址。
    set_real_ip_from 10.0.0.4;

# 定义请求标头字段,其值将用于替换$remote_addr。 即将proxy_protocol获取的IP替换原$remote_addr值。
    real_ip_header proxy_protocol;

    location / {
        proxy_pass http://test;
        proxy_set_header Host $http_host;
        proxy_set_header X-Forwarded-For $proxy_add_x_forwarded_for;
    }
}
查看web节点的nginx访问日志,我们可以看到成功获取到了客户端的真实IP地址,但是因为四层本身IP被排除,所以最后一个字段没有记录四层本身IP(咱也不知道如何让web记录完整的代理过程,望知道配置的大佬留言指点)。
[root@web1 ~]# tailf /var/log/nginx/access.log

10.0.0.6 - - [02/Sep/2020:07:28:54 -0400] "GET / HTTP/1.0" 200 36 "-" "Mozilla/5.0 (Windows NT 10.0; Win64; x64) AppleWebKit/537.36 (KHTML, like Gecko) Chrome/80.0.3987.106 Safari/537.36" "10.0.0.1, 10.0.0.5"
如果想将$remote_addr值显示为客户端的真实IP地址,那么web端可以配置以下配置(下面解释可能有些出入,但大致规律是这样的)。
[root@web1 ~]# vim /etc/nginx/conf.d/test.conf
server {
    listen 80;
    server_name test.cp.com;
    charset utf-8;

    set_real_ip_from 10.0.0.5;          # 定义信任地址
    set_real_ip_from 10.0.0.6;
    real_ip_header X-Forwarded-For;     # 将X-Forwarded-For字段包含的IP替换原$remote_addr值

# 这个设置决定了将X-Forwarded-For字段中那个IP替换成$remote_addr值。
# 启用,则是将$remote_addr值替换为由real_ip_header指令定义的请求标头字段包含地址中最后一个不受信任的地址。
# 禁用,则将与其中一个受信任地址匹配的原$remote_addr值替换为由real_ip_header指令定义的请求标头字段中发送的最后一个地址。
    real_ip_recursive on;

    location / {
        root /test;
        index index.html;
    }

}

[root@web1 ~]# tailf /var/log/nginx/access.log

10.0.0.1 - - [02/Sep/2020:09:17:39 -0400] "GET / HTTP/1.0" 200 36 "-" "Mozilla/5.0 (Windows NT 10.0; Win64; x64) AppleWebKit/537.36 (KHTML, like Gecko) Chrome/80.0.3987.106 Safari/537.36" "10.0.0.1, 10.0.0.5"