一、架构
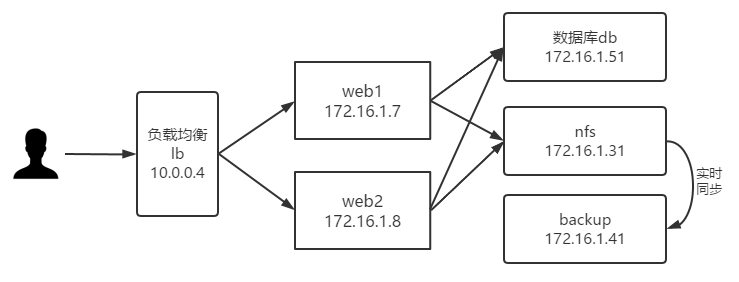
二、数据库搭建
[root@db ~]# yum install -y mariadb-server
[root@db ~]# systemctl start mariadb
[root@db ~]# systemctl enable mariadb
[root@db ~]# mysqladmin -uroot password 000000
[root@db ~]# mysql -uroot -p000000
Welcome to the MariaDB monitor.  Commands end with ; or \g.
Your MariaDB connection id is 3
Server version: 5.5.65-MariaDB MariaDB Server

Copyright (c) 2000, 2018, Oracle, MariaDB Corporation Ab and others.

Type 'help;' or '\h' for help. Type '\c' to clear the current input statement.

MariaDB [(none)]> create database wordpress;
Query OK, 1 row affected (0.00 sec)

MariaDB [(none)]> grant all on wordpress.* to 'cp'@'%' identified by '000000';
Query OK, 0 rows affected (0.00 sec)

[root@db ~]# setenforce 0
[root@db ~]# systemctl stop firewalld && systemctl disable firewalld
三、web集群构建(演示一个节点,其余web节点相同操作)
(1)安装nginx
[root@web1 ~]# vim /etc/yum.repos.d/nginx.repo
[nginx-stable]
name=nginx stable repo
baseurl=http://nginx.org/packages/centos/$releasever/$basearch/
gpgcheck=1
enabled=1
gpgkey=https://nginx.org/keys/nginx_signing.key
module_hotfixes=true
[root@web1 ~]# yum install -y nginx
(2) 安装php
[root@web1 ~]# yum install -y http://rpms.remirepo.net/enterprise/remi-release-7.rpm
// 注意这是精简安装,满足wordpress最基本需求。至于需要什么php扩展自行安装
[root@web1 ~]# yum install -y php74-php-fpm php74-php-mysqlnd  php74-php-gd
(3)统一运行用户
[root@web1 ~]# groupadd -g 666 www
[root@web1 ~]# useradd -u666 -g666 www
[root@web1 ~]# sed -i '/^user/c user www;' /etc/nginx/nginx.conf
[root@web1 ~]# sed -i '/^user/c user = www' /etc/opt/remi/php74/php-fpm.d/www.conf
[root@web1 ~]# sed -i '/^group/c group = www' /etc/opt/remi/php74/php-fpm.d/www.conf
(4)准备项目代码和nginx配置文件
[root@web1 ~]# wget https://cn.wordpress.org/wordpress-5.4.2-zh_CN.tar.gz
[root@web1 ~]# tar xf wordpress-5.4.2-zh_CN.tar.gz -C /
[root@web1 ~]# gzip /etc/nginx/conf.d/default.conf
[root@web1 ~]# vim /etc/nginx/conf.d/wordpress.conf
server {
        listen 80;
        server_name wordpress.cp.com;
        root /wordpress;

        location / {
                index index.php;
        }

        location ~ \.php$ {
                fastcgi_pass 127.0.0.1:9000;
                fastcgi_param SCRIPT_FILENAME $document_root$fastcgi_script_name;
                include fastcgi_params;
        }
}
(5)配置数据库连接
[root@web1 ~]# cp /wordpress/wp-config-sample.php /wordpress/wp-config.php
[root@web1 ~]# vim /wordpress/wp-config.php         //修改以下选项
/** WordPress数据库的名称 */
define( 'DB_NAME', 'wordpress' );

/** MySQL数据库用户名 */
define( 'DB_USER', 'cp' );

/** MySQL数据库密码 */
define( 'DB_PASSWORD', '000000' );

/** MySQL主机 */
define( 'DB_HOST', '172.16.1.51' );

/** 创建数据表时默认的文字编码 */
define( 'DB_CHARSET', 'utf8mb4' );

[root@web1 ~]# chown -R www.www /wordpress/
(6)启动
[root@web1 ~]# systemctl restart nginx php74-php-fpm
[root@web1 ~]# systemctl enable nginx php74-php-fpm
[root@web1 ~]# systemctl stop firewalld
[root@web1 ~]# systemctl disable firewalld
[root@web1 ~]# setenforce 0
四、负载均衡搭建
(1)安装nginx
[root@lb ~]# vim /etc/yum.repos.d/nginx.repo
[nginx-stable]
name=nginx stable repo
baseurl=http://nginx.org/packages/centos/$releasever/$basearch/
gpgcheck=1
enabled=1
gpgkey=https://nginx.org/keys/nginx_signing.key
module_hotfixes=true
[root@lb ~]# yum install -y nginx
(2)配置七层负载均衡
[root@lb ~]# groupadd -g 666 www && useradd -u666 -g666 www
[root@lb ~]# sed -i '/^user/c user www;' /etc/nginx/nginx.conf
[root@lb ~]# gzip /etc/nginx/conf.d/default.conf
[root@lb ~]# vim /etc/nginx/conf.d/proxy_wordpress.conf

upstream wordpress {
    server 172.16.1.7:80;
    server 172.16.1.8:80;
}

server {
    listen 80;
    server_name wordpress.cp.com;

    location / {
        proxy_pass http://wordpress;
        include proxy_params;
    }
}
[root@lb ~]# vim /etc/nginx/proxy_params
proxy_http_version 1.1;

proxy_set_header Host $http_host;
proxy_set_header X-Real-IP $remote_addr;
proxy_set_header X-Forwarded-For $proxy_add_x_forwarded_for;

proxy_connect_timeout 30;
proxy_send_timeout 60;
proxy_read_timeout 60;

proxy_buffering on;
proxy_buffer_size 32k;
proxy_buffers 4 128k;

[root@lb ~]# systemctl restart nginx
[root@lb ~]# setenforce 0
[root@lb ~]# systemctl stop firewalld && systemctl disable firewalld
(3)测试
测试前修改本地电脑的hosts的文件,位于C:\Windows\System32\drivers\etc,做以下修改。

浏览器访问测试,自行完成安装流程,上传图片验证负载均衡,注意连接超时时间,为了效果可以临时将proxy_params文件中的有关timeout的修改为1。

五、nfs和backup节点搭建
经过上面测试,相信大家都发现接入负载均衡后的问题所在了吧,web集群静态资源不能共享。这就导致当用户在一台节点上传资源,当用户再次访问时,负载均衡将此用户调度到另一台节点,而另一台节点并没有用户上传的资源,导致用户访问不到自己上传的资源。
为了解决以上问题,我们采用nfs服务给web集群共享静态资源,同时搭建backup节点实时同步备份nfs节点的资源。
(1)nfs节点搭建
[root@nfs ~]# yum install -y nfs-utils           //web节点也需要安装
[root@nfs ~]# vim /etc/exports
/data 172.16.1.0/24(rw,sync,all_squash,anonuid=666,anongid=666)
[root@nfs ~]# groupadd -g 666 www && useradd -u666 -g666 www
[root@nfs ~]# mkdir /data
[root@nfs ~]# chown -R www.www /data
[root@nfs ~]# systemctl restart nfs rpcbind
[root@nfs ~]# systemctl enable nfs rpcbind
[root@nfs ~]# setenforce 0
[root@nfs ~]# systemctl stop firewalld && systemctl disable firewalld
所有web节点挂载
[root@web1 ~]# showmount -e 172.16.1.31
Export list for 172.16.1.31:
/data 172.16.1.0/24
[root@web1 ~]# mount -t nfs 172.16.1.31:/data /wordpress/wp-content/uploads     //此目录为用户上传资源存放的位置
[root@web1 ~]# df -h
Filesystem               Size  Used Avail Use% Mounted on

.....

172.16.1.31:/data         17G  1.2G   16G   7% /wordpress/wp-content/uploads
(2)backup节点搭建
配置rsync服务端
[root@backup ~]# yum install -y rsync       //nfs节点也有安装
[root@backup ~]# vim /etc/rsyncd.conf
uid = www
gid = www
port = 873
fake super = yes
use chroot = no
max connections = 200
timeout = 600
ignore errors
read only = false
list = false
auth users = rsync_backup
secrets file = /etc/rsync.passwd
log file = /var/log/rsyncd.log

[data]
path = /data
根据配置完成对应初始化操作
[root@backup ~]# groupadd -g 666 www
[root@backup ~]# useradd -u666 -g666 www
[root@backup ~]# mkdir /data
[root@backup ~]# chown -R www.www /data/
[root@backup ~]# echo "rsync_backup:000000" > /etc/rsync.passwd
[root@backup ~]# chmod 600 /etc/rsync.passwd
[root@backup ~]# systemctl restart rsyncd
[root@backup ~]# systemctl enable rsyncd
[root@backup ~]# systemctl stop firewalld
[root@backup ~]# systemctl disable firewalld
[root@backup ~]# setenforce 0
基础功能测试
[root@nfs ~]# rsync -avz 1.txt rsync_backup@172.16.1.41::data
Password:
sending incremental file list
1.txt

sent 87 bytes  received 43 bytes  20.00 bytes/sec
total size is 0  speedup is 0.00

[root@backup data]# ll
total 0
-rw-r--r--. 1 www www 0 Aug 28 07:54 1.txt
(3)NFS服务器利用lsyncd服务实现实时监控同步
[root@nfs ~]# yum -y install -y lsyncd
[root@nfs ~]# vim /etc/lsyncd.conf
settings {
 logfile = "/var/log/lsyncd/lsyncd.log",
 statusFile = "/var/log/lsyncd/lsyncd.status",
 inotifyMode = "CloseWrite",
 maxProcesses = 8,
}
sync {
 default.rsync,
 source = "/data",
 target = "rsync_backup@172.16.1.41::data",
 delete= true,
 delay = 1,
rsync = {
 binary = "/usr/bin/rsync",
 archive = true,
 compress = true,
 verbose = true,
 password_file = "/etc/rsync.password",
}
}

[root@nfs ~]# echo "000000" > /etc/rsync.password
[root@nfs ~]# chmod 600 /etc/rsync.password
[root@nfs ~]# systemctl restart lsyncd
[root@nfs ~]# systemctl enable lsyncd
实时同步测试,我们在wordpress上传一张名为raid的图片。此时我们可以看到,nfs服务器上data目录的数据实时同步到了backup服务器的data目录上了。
[root@nfs ~]# tree /data/
/data/
└── 2020
    └── 08
        ├── nfs1.png
        └── raid.jpg

2 directories, 2 files

[root@backup ~]# tree /data/
/data/
└── 2020
    └── 08
        ├── nfs1.png
        └── raid.jpg

2 directories, 2 files